Showing posts with label barbie. Show all posts

Sunday, October 1, 2023

When You Can't Afford the Mini Verse Capsules

My daughter came up to me and says, "Mom, can you buy or make doll foods? Our Barbies need some."

Hmm.... Not like I'm Made of Money (even though that's what my kids think Mom means). So... I need to figure out how to make them. I've watched some My Froggy videos on YouTube. It is where I get all kinds of ideas. And I decided to give it a go. After all, my dolls need a variety of foods too. Here goes! Let's check out some ideas.

Key Lime Pie

I started with a pie. After all, they are usually easier. I cut some thin foam to fill in the pie pan - which was the top of the poster tube.

Originally, I thought the bottom pieces needed to be tan for the crust, but you can't see them, so any color would work. The top is lime green, which is why I thought of the key lime pie. I mixed some white paint with Elmer's glue to make the white around the edges for the meringue.

This also allows me to glue down some 'limes' made from tiny bits of the foam I had leftover. The first one definitely came out messier... I thought I could just use a toothpick to dribble in the white. Turns out, that doesn't work so well when you shake too much. 

I made a couple of things a while back from some art mousse that came with an art kit my daughter had. I made a little ice cream. This was from a piece of plastic from a pen, the mousse, and a dot of hot glue on top. It is a little small, so my daughters use this one for their tiny dolls. 

In the jar, I made cookies from the mousse. You have to work quick and roll it before it starts to dry. Then I painted them. The little jar was found at the Dollar Tree in a pack. 

Taking the easier path...

I am so thankful to my dad for giving me a 3D printer! Us... sending us... a 3D printer. It is amazing how many things you can find the files for. Tiny foods included! So I have been printing things almost nonstop. 

How about turkey for Thanksgiving dinner? Except I printed it a little small. So, Thanksgiving for two! This is where you can find that file

I have also printed bottles that can be used as soda, or if your dolls are adults who want something stronger - alcoholic beverages. This file has to be resized to fit the doll, but came out great!
I made a couple Romulan Ale bottles as well as a Quantum Cola bottle from Fallout. My dolls are total nerds. Don't judge.

Donuts were next on my agenda as we have sweet tooth galore in this house. I had to fiddle with the sizing and after about 3 tries, finally reached the appropriate fit. I chose to upsize it to 400% of the original file. Great thing about the sizes that came out too small is that the smaller dolls my daughters have now have donuts too! And they have something to stock their food truck with. Now to find a file for a donut box.... But here is the donut file. I also told my daughter that we would get some acrylic paint and make them look glazed. 

I'm not a huge soda fan, but since I found the file, I figured I might as well. Again, had to resize until I found the right dimensions for the dolls.

I was able to resize and print some labels too. They came out pretty good.

I printed some lemons that came out a little larger than you would think. They are also not as easily identifiable. But I love them nonetheless. HERE is the file. I would suggest trying to resize it to 15% of the original.

While I'm with yellow colored foods, I knew that bananas had to be included. So I found a file for those too! These I resized to 209%. Otherwise you are talking about a super minuscule banana! 

I figured yellow was close enough for waffles. And since I love them, my dolls do too! I found this file and printed them at 20% the original. 

I have been looking for things that could also be useful for the holidays that are coming up. I have a turkey, but what else? I saw this platter of what I decided to make cookies and knew it would be a perfect addition. I painted them to resemble chocolate chip, my favorite kind. These can be used for all kinds of photos later. The one I printed for my daughters, they turned into cinnamon rolls! 

I swapped to red. And began printing red foods. Like apples and tomatoes.

And tomato slices! When my husband saw the slices, he said I was going snowflake... This is an inside joke that essentially means I'm getting a Moms version of cabin fever from being stuck inside with my kids for too long. I had to play with resizing on each one to get the size I wanted. I chose to go larger on the apples and tomatoes.

Don't forget your kitchen accessories!

Some days, you just want to chill in bed. And when that happens, you need a tray to enjoy your food in bed. That is why I printed this nifty little tray. (And yes, I 3D printed those eggs too!)

My goals now are to try my hand at making playdoh foods. Make, dry, paint and play! Not sure how well that will work, but can't hurt to try, right? What suggestions might you have? Leave me a comment below and I'll see what I can do.

Tuesday, September 12, 2023

Giving This Toy a Makeover

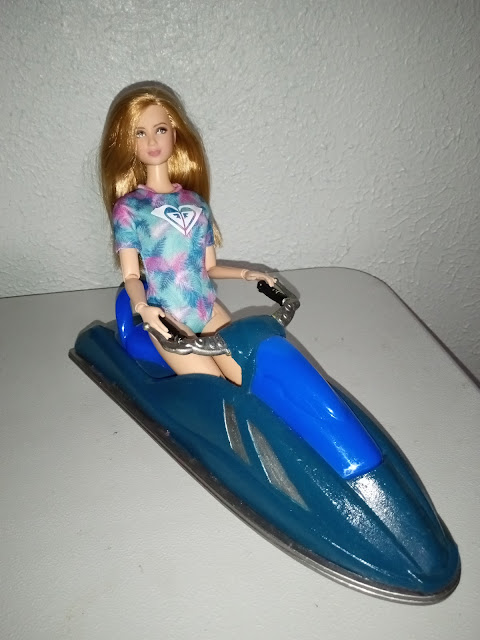
I love the doll world. I make things for my girls or little sister. And occasionally I give a makeover to things we pick up. My most recent one? A Barbie-sized jet ski with a new paint job! 

I found this jet ski at the Dollar Tree. But it was a bright pink and blue. I'm really not a fan of pink. At. All. The girls were thrilled with theirs. But I knew mine had to be a different color. So I set out to paint it. It took me a long while. I would work on it in between other chores or while the kids were sleeping. And I think it came out nicely! 

First things first, it is plastic, so it had to be primed. At the time, I didn't have money and didn't realize we had primer in the shed. So I sanded the surfaces to make them a little rough. 

Then I began the painting process. I chose this teal and silver color scheme. Even after sanding, the paint had issues sticking. So it took several more coats than I had figured on. I decided to leave the front piece and seat piece their original blue to contrast. Partly from laziness, partly because I think it works. And then before I added those two back on, I sprayed it down with a clear coat sealing paint. Which worked out great, because the teal was a matte paint, but the clear coat gave it a shine! 

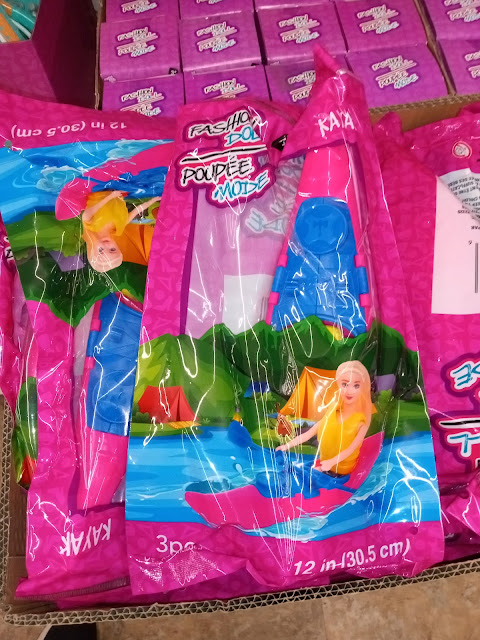
What do you think? Did it come out well enough? Would you try such a thing? I know the Dollar Tree had these kayaks too. My daughters love theirs. I've been tempted to grab one for myself and give it a makeover too...

Wednesday, September 6, 2023

Thrifty Doll House Renovating by Robin

My Mom likes to find Barbie houses for bargain prices at thrift stores and yard sales around her town. She had a room that had become the Barbie City that the girls play with in their previous home. But she doesn't just keep them as they came. Especially when they come with plenty of wear. She gives them a makeover to make my little sisters' and nieces play time more fun. She sent me some photos and her tips to help you get some ideas in your own renovating projects! 

Here is the house she decided to change up. This is a 3 story one. With 5 areas, or rooms, included. 

The first thing she did was to pick up these bamboo placemats at the thrift store. She found these for .50 each!

Using a combination of hot glue and E6000 glue, she began to attach them to the floor of the room she was working on after cutting them down to the right size. 

Starting in the middle

She chose to start in the middle room. Don't think you have to work top to bottom or bottom up. Start in the room that speaks to you first! Her ideas for this one were already set, especially with the materials she had on hand.

She also grabbed these large sticker pages from the Dollar Tree. They are $1.25 each. She bought these to cover the walls with. The room already looked amazing after just changing the floor and walls!
And the final part - was the ceiling. After all, that pink clashes hard. She chose to use these card stock pages for the ceiling.
You might still find them at your local Dollar Tree. (More info on those below) For this particular room, she added some furniture pieces she found on TEMU to give it a cozy living space look.
You can find the sofa here. It also comes with storage space. This can be really useful in a small space. There are several other options to browse through too.

 Now for the kitchen...

                             This is what it looked like originally.

She chose to use the other placemat in the kitchen. I really think this look works well there. I almost think of a Japanese-styled kitchen. Not even sure why.
She bought this kitchen playset on Amazon. It comes from the My Fancy Life series of room playsets. Not Barbie. But it is good quality and even came with accessories for a more affordable budget. It is just under $20.
 
She decided to give it a paint job and use it to make a real kitchen look. At first she thought she would use the light green, but then decided she preferred a black and white color scheme.
With the bamboo floor, she added this textured paper to give the walls an awesome style.
And once again used the strips of extra bamboo to give it a more seamless look in the corners.
Her kitchen is going with blue tones in some of the furniture. So far she has some chairs to go with the kitchen wall set.
She added a tile look to the ceiling. Now to make the dining table.

Next, we go to the bathroom...
There is a bathroom. That sure needed some real love. The floor and a wall had some markings on it.
So Mom added these sticker pages from the Dollar Tree to the walls. As well as this sticker tile for the ceiling. It takes on a really classy look.
Gave it a great gold and ivory theme! For the floor, she found this wood grain pattern paper to use.
Then using leftover pieces from the bamboo placemats, she created baseboard trim around the edges of the walls.
Add in this tiny toilet
, a tub and a sink. Maybe later, there will be artwork on the walls. Or even a vanity mirror. Then relaxing will be amazing!
She found these at Hobby Lobby to add in later. As she was working on this project, they were also in the middle of moving. So I may come back later with additional photos.

The very top floor

This room needed some extra love as well. 
It was temporarily the catch-all for random things. Until it met some upgrades. 
 

We have this top most floor that is meant to be a bedroom. She grabbed another sticker page to create floor look she wanted. I really liked this pattern. I've even used it for my own diorama room.

This cute dresser can be found here. It adds an elegant touch! And you can choose from that sofa I showed you above as well as find the round chair from the photo above too. She re-papered the walls to give it neutral cream tones.

 The walls look a little loose here. When it comes to attaching paper to the dollhouse walls and ceilings, sometimes you have to test what works best. A glue stick seals it on smoother, but takes SO long. Spray glue tends to leave splotches that are darker. Elmer's glue, the bottle kind, makes for bubbles in the papering. E6000 on the ceiling just came loose. So she ended up have to peel the paper off and then peel off the dried glued bits too. Just some insight into the various kinds that were tried in this project. Now, to check out the room in a more finished look!
This is the master bedroom. Other dollhouses have bunkbeds and baby beds. It was time to have a room for the parents. And this one really looks the part. Like the little negligee on the dresser! The bed was made from wood pieces found at the Dollar Tree. It is only missing a paint job and some proper bedding. But temporarily, it looks pretty good. And it is a queen size one so that the couple can both fit.

Next to the bedroom...

She has this little balcony where they can chill and see the stars. The pattern for the flooring is already good. Adding a wicker chair completes the look. I feel like her Ken just needs a guitar to serenade her Barbie under the moonlight.

Looking closer to a finished home!

At this point, it is coming along nicely. So many beautiful elements. She was still planning to glue the white shelf to the wall in living room. That was two shelves glued together to make a cabinet.
It really does look classy, but cozy. And way more cleaned up! I love the use of things you can find at the Dollar Tree or even thrift stores.

Other wall and floor options to consider

She found these cardstock pages in the craft aisle at the Dollar Tree. They have a textured look that works really well for wallpaper or even for the ceilings. They come in a pack of 3 sheets. I totally plan to go look for similar ones. When I glanced at my store last time, I had only seen the sparkling themed colors. 

Scrapbook pages make projects like these amazing. You can really get a look you love with them. Hobby Lobby and thrift stores make finding things like this much easier and often affordable. 

Pages like this are actually stickers. So much easier to use when all you have to do is peel and stick!

Let me know your thoughts below! Have you renovated a dollhouse before? What elements did you find to use and where did you find them? I'm looking into doing rooms or houses of my own in the future and I'd love some ideas!